There’s nothing more stressful than spending time on eye makeup, looking wonderful in the mirror… and then watching it evaporate the second you open your eyes. If you have hooded eyes or droopy eyelids, that “where did my eyeliner go?” moment is real. The good news is that neither a drawer full of palettes nor an intricate procedure are necessary. To keep your shadow and liner visible when your eyes are relaxed and facing forward, you simply need to put them more strategically.
Why hooded lids make makeup vanish (and why it’s not your fault)
With a hooded lid, extra skin rests over part of the moveable lid space, so the characteristic “crease” can get covered. That alters everything: thick liner can make the eye appear smaller rather than elevated, and shadow applied in the natural crease can vanish. Aging can also make upper lids look heavier as skin stretches and supporting structures weaken; in more apparent cases, extra skin can even impede upper and outer peripheral vision. That’s one reason some people look into blepharoplasty, but for cosmetics, the immediate cure is simply working higher and keeping definition tight.
Droopy lid vs. hooded lid: quick terms you might hear
Knowing the terminology is helpful when looking for tips because not all “droopy” lids are created equal. Clinically, ptosis is when the upper lid droops because the levator muscle is weak (it might be present from birth or show up later). What most of us call hooded lids is often extra upper-lid skin—commonly discussed as dermatochalasis. You don’t need to diagnose anything to do your makeup effectively, but it explains why certain eyes need a “new crease” drawn above the fold.
The placement shift that opens the eye: create a higher, visible crease
The main tip is straightforward: start creating your appearance where your crease will be seen, rather than where you believe it “should” be. That usually involves placing your transition shade a little higher than instinct—so it shows when you’re staring straight ahead with eyes open. (Yes, it seems strange at first, like you’re breaking the rules, but that’s precisely why it works.) Your entire eye area reads more lifted and smoother after you see your shape mirrored back at you.
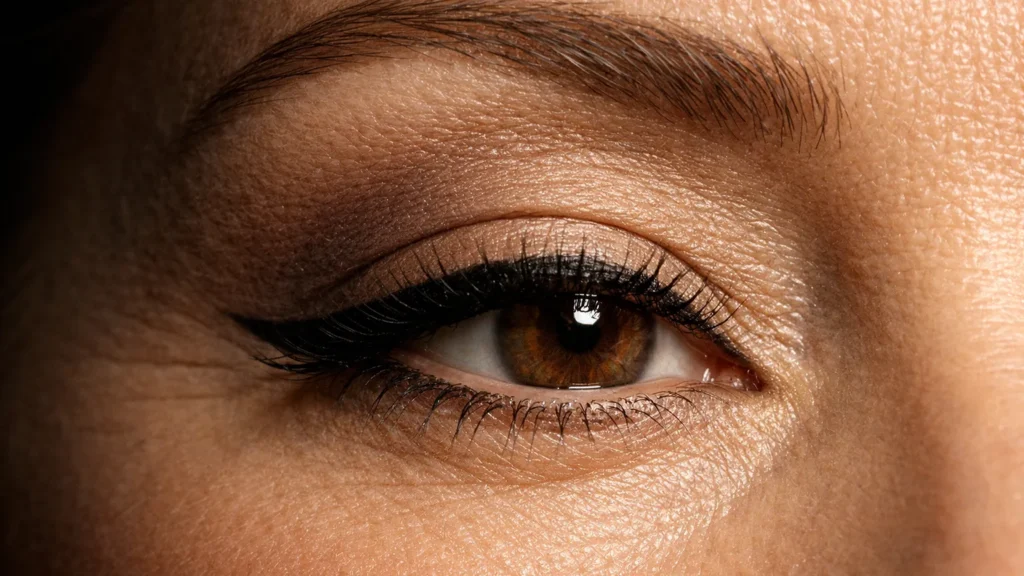
Six steps for everyday makeup on hooded or droopy lids
- Map the visible crease with eyes open. To ensure that the shade is visible as your eye relaxes, position your transition color approximately 1 cm above where your lid fold is located while facing straight ahead.
- Sketch a “new crease” in soft brown. Use a medium brown and build it with small, delicate strokes to simulate a natural shadow instead of a rigid line.
- Blend upward and outward. To maintain the lift effect, slightly diffuse the edge toward the brow’s tail (think: up, not out wide).
- Brighten the lid with a light matte or satin shade. Intense glitter can highlight small lines and catch texture, so keep it mild and smooth.
- Focus on the outside corner after applying a thin line of eyeliner. Skip a thick band across the whole lash line. Concentrate definition at the outer third and add a slight upward flick.
- Finish mascara with additional attention to outer lashes. To make the eye appear more almond-shaped, aim the wand so that the outer lashes sweep up and out.
What I’ve observed over the years is that most of us aren’t “bad at eyeshadow”—we’re just painting in an area no one can see. I must admit that I chuckled a little when I initially began blending above my natural fold because it was dramatic up close. Then I opened my eyes, moved back, and there it was: the shape finally showed up precisely where I wanted it. That’s the moment this technique clicks.
A quick guide to what goes where (so it shows on open eyes)
Every millimeter matters when lid space is restricted. Because the fold can “eat” your work as soon as you stop raising your eyebrows, makeup experts frequently advise applying liner with your eyes open. Tightlining, or applying liner along the lash roots and upper waterline, is another expert technique that’s worth learning because it creates depth without consuming valuable lid area that you might want for shadow.
Smart placement cheatsheet for hooded lids
| Area | What to do (and why) |
|---|---|
| Transition/crease | Place color higher than the natural fold so it stays visible with eyes open. |
| Mobile lid | Use a light matte or satin to reflect light and keep texture subtle. |
| Upper lash line | Keep liner thin; concentrate depth on the outer third to avoid closing off the eye. |
| Waterline | Try tightlining for definition that doesn’t steal lid space. |
Mistakes that make hooded eyes look heavier (and easy fixes)
The most typical issue is placing dark shadow too low, right inside the fold—then it disappears and can look muddy. Another is making the crease region overly glossy; when the lid overlaps, sparkle can highlight the texture. Additionally, the traditional thick liner stripe that runs the length of the top lash line frequently backfires on hooded lids because it consumes the little visible lid. If your wings stamp onto the upper lid, shorten the flick and tilt it slightly upward rather than straight out.
Makeup that actually stays visible: keep it simple, keep it intentional
Build your shape for the eye you see while it’s open, not the eye you see when it’s closed, if you can only remember one thing. The entire look can be altered to appear more alert, lifted, and natural with a higher crease, a gently bright lid, and well-placed definition in the outer corner. You’re not alone if you’ve been struggling with your eyeliner or wondering why your eyeshadow placement never looks as good as it does on other people. Share what’s worked for your hooded eyes in the comments—there’s always a fresh tip worth stealing.

